Feeds:
Posts
Comments

I am going Blog crazy today.  Really I’m just sitting in class blogging but it looks like I am taking rapid notes!

After making dessert which is of course the most important part of a meal I decided to make something a bit more hearty and nutritious.  This recipe is adapted from The Curvy Carrot.

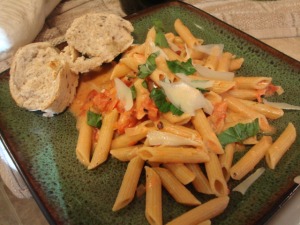
Tomato Mascarpone Pasta

Ingredients:

2 tablespoons extra virgin olive oil

1 large shallot, chopped finely

2 garlic cloves, minced

1 14-ounce can of diced tomatoes (don’t drain the juices…they will go into the sauce, too!)

** Used Fire Roasted diced tomatoes because it gives the pasta a woodsy flavor! yum!

1/2 teaspoon I doubled it and used 1 teaspoon for added spice crushed red pepper

1/2 teaspoon garlic (becausse I didn’t have garlic salt) salt

1/2 teaspoon dried oregano

3 ounces mascarpone cheese

** If you are on a tight budget you can use cream cheese as a substitute but the mascarpone does taste richer.  I treated myself this time around.

2 tablespoons fresh basil, chopped

8 ounces whole wheat spaghetti penne (because it’s what I had)

Parmesan cheese, for serving

**  You get the most beautiful shaved Parmesan Cheese when your use your veggie peeler to shave off Parmesan from a block!

Fresh basil, for garnish

Instructions

1. In a large sauté pan over medium heat, heat the olive oil until shimmering.

2. Add the chopped shallot and cook, stirring occasionally, until the shallot is softened, about 3-4 minutes.

3. Add the minced garlic and cook until fragrant, about one minute.

4. Add the fire roasted diced tomato (and the juice!) to the pan, stirring thoroughly.

5. Reduce the heat to low, and simmer, stirring occasionally, until the sauce is thickened, about 30 minutes.

6. Meanwhile, bring a large pot of lightly salted water to a boil and cook the pasta, according to package directions.

7. Once the sauce has thickened, add the mascarpone cheese (or cream cheese if you choose so), red pepper, salt, basil, and dried oregano, mixing thoroughly.

8. Once the pasta is completely cooked, drain it, making sure to reserve about 1/3 cup of the pasta water.

9.  Add the pasta and the reserved pasta water to the sauce, and toss gently to combine.

10. Serve immediately, and garnish as desired with fresh Parmesan cheese and basil.
Last night I was avoiding studying for my TWO (not one… no no 2) Praxis exams next weekend, so I decided to do a little cooking, baking, and freezing.

I started with dessert of course.  Chocolate and Salted Carmel Pudding Pops! DELISH!  I adapted the recipe from Endless Simmer that you can find here.  I may have burned the carmel a bit, I wont know until I taste them tonight.  I’ll update and let you know!  Below are my adaptations:

Ingredients:

Chocolate Pudding Mix (Instant) (the small box)

Vanilla Pudding Mix (Instant) (the small box)

Salted Carmel Sauce:

  • ½ cup granulated sugar
  • 2 tablespoons water
  • 2 tablespoons unsalted butter
  • 6 tablespoons of heavy cream
  • ½ teaspoons of kosher salt
Other Materials Needed:
2 Sandwich Ziplock Bags
Popsicle mold or dixie cups and popsicle sticks
Step One: Make both the Chocolate and Vanilla Pudding according to the directions on the box. (Endless Simmer give instructions on how to make homemade pudding, I was too lazy for that.)  Set aside.
Step Two: Make Salted Carmel Sauce:  Add sugar and water into a saucepan over medium low heat. Stir until sugar has dissolved. Use a wet brush to remove any crystals that form on the side. Once sugar has dissolved increase heat to high. Now and then, using the handle give the pot a swirl to keep the mixture moving. Do not stir the mixture directly. The mixture will start to bubble after a minute. As the mixture darkens to a medium amber color, approximately 5-7 minutes  (Endless Simmer suggests 5-7 minutes, mine only took about 2-3 minutes), add the butter and cream to saucepan. The mixture will bubble wildly. Whisk to combine (bubbles will subside upon cooling). Add salt and stir to combine.
Step Three:  Allow Salted Carmel Sauce to cool for about 5 minutes then fold into vanilla pudding mix.
Step Four: Pour or spoon pudding into individual sandwich ziplock bags.  Cut off the bottom corner of each bag.  Squirt a bit of chocolate pudding into mold or dixie cup and then do the same with the salted carmel pudding.  Layer your popsicles to your artistic desire until most of the way full.
Step Five: Freeze!  If you are using dixie cups and popsicles sticks then freeze the cups for two hours before inserting the popsicle sticks.  Freezer time varies.  I checked mine at 3 hours and they were still a bit soft.  For best results allow to freeze over night.


Half & Half

Some of my sweet friends Jessica and David (Da-vee-d) are having their first child premiering in August.  Of course this is uber exciting but what makes it even better is that this child will be a beautiful mix of Bolivian and American.  To celebrate this mixture I had to create a unique gift for Jessica’s Baby Shower.

This was a super fun project.  It took a bit longer then I anticipated but was worth it!  Below is the tutorial:

Materials:

– Freezer Paper

– Fabric Paint

– .5 yard Cotton Fabric

– .5 yard Towel Material Fabric

– 1 Snap

Step One:

Use a bib pattern and cut out the template from both the cotton and towel fabric.  I used Amy Carol’s Bend the Rules Sewing Bib Pattern.  Here is a link to her but I’m sure you can find a free bib pattern by googling it.

Step Two:

Once you have chosen your painting design draw in to Freezer paper and then cut it out using an xacto knife.  You will have to cut out multiple patterns if you have different colors.  Example: For the American Flag I cut out the red stripes, ironed it on, painted it and then repeated for the white stripes and the blue square.

The same goes for the lettering that I did.

Step Three:  Once you have cut out the freezer paper you can iron it onto the fabric that you want to paint.

Step Four: Paint

Step Five: Once the paint is throughly dry you can peel off the freezer paper and Wa-La you have a screen printed piece of fabric.

Continue these steps until you design is complete.

Step Six: Finish your bib following your bib tutorial’s directions.

Step Seven: Finish the Bib by Hammering and snap!

A good friend of mine is starting up a retail and design services business called Design Narrative and I just finished up her business cards which to me makes her OFFICIAL and legit!  Congrats Kelley, you’re going to do great!

A running joke in the family, I always forget important dates, Thanksgiving (it’s always a Thursday right?), birthdays, anniversaries, and of course mother and father’s day.  As I so proudly called my father today to wish him a Happy F day he asked me who reminded me… “Jesse?”, “You’re calendar in your phone?”…  “No dad I remembered all on my own this year!” I say so proudly.  A few second go by and I have to confess to my father, “Okay dad I was on my computer this morning checking the blogs I follow and many people had posted about Father’s day… that is how I remembered.”  The truth was out.  But I still remembered right?!  I give myself credit this year.

Needless to say after talking to my own pops I was inspired to make some cards for the father’s in my life. (at this point it’s just my dad, and my father in-law).  I went old school and used my type writer to muster up some pappa love.  Here’s how they turned out:

To: My one and only Pops

6.19.11 Happy Father's Day

To: Jim O'Hatnick The one and only

6.19.11 Happy Father's Day

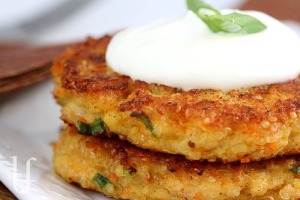
Last night was a beautiful exception!  I had dinner with a friend! YAY!  Kelley came over with some homemade milkyway ice cream and I fixed up some more grilled veggies, roasted corn but added quinoa burgers! Which after last night has become my new favorite alt burger!

See my Dinners of Solitude post for directions on the grilled veggies and roasted corn.

As for the Quinoa Burgers I took many beautiful pictures with my camera to find out I did not have my memory card in it so I am attaching pictures from the source I adapted the recipe from!

Quinoa Burgers

1 cup uncooked quinoa

2 cups water

1/2 teaspoon salt

To cook quinoa:

In a medium saucepan bring the 2 cups water and 1/2 teaspoon salt to a boil over high heat.  Add quinoa and reduce heat to low.  Cover and cook for 18-20 minutes, or until all water is absorbed and the seeds are tender.  Allow to cool for a few minutes.

3/4 cup shredded cheese of your choice (I did halfsies with pepper jack and colby jack)

1/2 cup cottage cheese (fat free)

1 medium carrot, finely grated (I used a micro plan grater)

3 eggs (fresh from the chickens out back)

2-3 tablespoons all purpose flour

Breadcrumbs to thicken as needed

2 green onions, including white parts

1 /2 teaspoon sugar

1/4 teaspoon black pepper

1/4 teaspoon ground cumin

1/8 teaspoon salt

1/8 teaspoon garlic powder

Olive oil for frying (I’m thinking next time I’ll bake them to see how they turn out but the frying is TO DIE FOR)

In a large bowl combine the cooked quinoa, cheddar cheese, cottage cheese, carrot, eggs, flour, green onions, sugar, pepper, cumin, salt, and garlic powder.

Heat a frying pan and a couple teaspoons olive oil over medium-low heat.  Measure 1/4 cup and form into patties about 1/2 inch thick  – mixture will be slightly sticky.  Fry until golden-brown, about 4 minutes on each side.   Makes approx. 10 burgers.

I topped the burgers with a yogurt dressing:

3 Large spoonfuls of plain yogurt (greek if you have it, I did not)

1 small spoon of sour cream

To Taste:

garlic powder

dill weed (I used the most of this)

salt

pepper

Mix it all up, taste test, add what you think it needs, repeat until perfection.

Quinoa burgers were topped with yogurt dressing, sliced avocado, red onion, and heirloom tomato slices!  SOOOOOOOOOOOO good!  Thanks EatWellLivingThin for the great idea!  Thanks Kelley for breaking me out of solitude!

So the Hubs is a director of an urban ministry that runs a camp in the summer which in turn demands all of his time for 6+ weeks during May, June, and July.  He is out of the house by 6:30 am and comes home no earlier then 10:30pm.

I am in school this summer working on my master which demands all of my time an energy to sipping on coffee and reading research.

This leads me to my Dinners of Solitude series I am documenting starting today.  95% of my meals are eaten alone (well not alone because breakfast and dinner are with the Rusty dog).  Sad I know but I am going to embrace this solitude and explore some vegetarian delicacies.

Here we go!

Dinner #1: June 12th, 2011:

Grilled Veggies and Roasted Corn

Oh how EarthFare call out to me and I in turn empty my pockets…  I went there on Saturday to pick up some wax sandwich bags, sprout seeds, and my free 5 ears of corn (Love Earthfare Coupons) and came out with veggie skewers, garlic dressing, soap, and much much more.

I made a marinate of ingredients and flash marinaded the veggies and then grilled them up! Delish!

Marinade:

Equal Parts:

– Balsamic Vinegar

– White Wine Vinegar

– EVOO

– Garlic Expressions (a delicious dressing Earthfare sells with Apple Cider Vinegar, roasted garlic and some spices)

Chunk chop some veggies to be grilled. I used:

– Red Onion

– Green and Red Peppers

– Portabella Mushrooms

– Yellow Squash

– Zucchini

Place chopped veggies in a bowl and and pour marinade over veggies and mix well adding salt and pepper to taste.  Transfer veggies to a grilling Wok and place on grilled heated to Medium.

Stir and Grill for approximately 15 minutes.

As for the Roasted Corn (that by the way was FREE via EarthFare Coupons):

Ear of Corn

Butter

Nature’s Seasoning

Strip down the husk of the corn without removing the husks until you get to the fresh corn.  Remove corn hairs and discard (I like to compost them).  Butter corn to your desired level and then sprinkle with Nature’s Seasoning.  Gently pull the husk back onto the corn layer by layer.  This creates an insulator when on the grill so the corn heat evenly.  When all the husk layers are back in place use a trash bag tie at the tip of the ear.  Grill corn on the Medium for approximately 15 minutes, rotating the husk every 5 minutes.

Enjoy!

Dear Ben,

I planned to come to your birthday party, I promise.  First it was really needing silence to celebrate the last day of school.  Then it was the need to go for a run, which led to having to charge the iPod just a bit.  Then the run (which was way too slow, my excuse is the heat).  Then… then there was the card.  I know your mom said no gifts which was fine but I had to make you a card.  “HI BECKY!”  Is what I hear most afternoons as I roll into our neighborhood and I LOVE IT!  This was my “HI” back…

A birthday card for your 2nd year of life!

BUT then I go to print your card and our printer (officially from the 90’s) is out of blue ink (cyan if you will).  I search for more and there is none.  “Fine” I say… I’ll go to the party empty handed.  I look at my watch and 8:09.  Party is over.  I’m sorry Ben, but I was wishing you a delightful birthday from right across the street.

Sincerely,

Your Neighbor “Hi Becky”

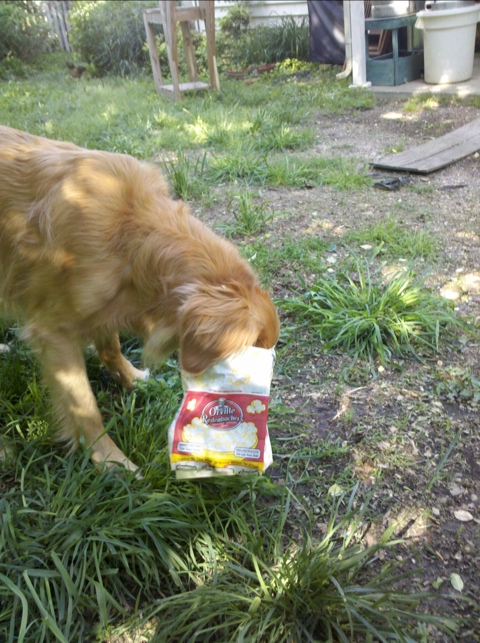
As I am procrastinating studying for my Praxis outside the wind blows and my stale bag of popcorn flies…. Then my dog flies…. To get the popcorn of course. I didn’t know he was so into fiber

20110429-050218.jpg
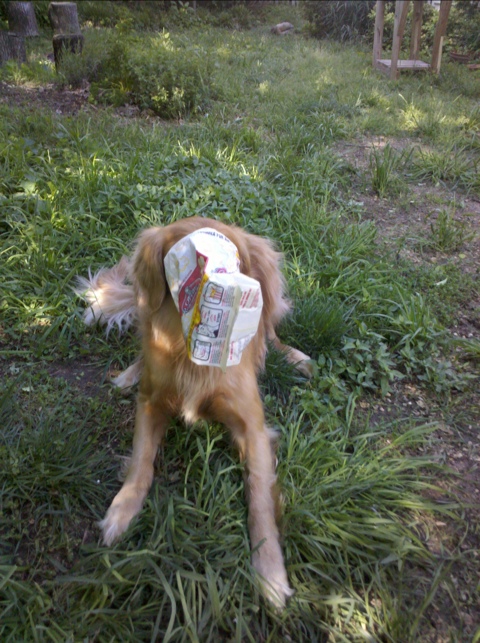
Liking it… Liking it…. Then:

20110429-050308.jpg

“how the he’ll do I get this off guys?” – rusty

It is true that I find most enjoyment in wrapping gifts for people then I doing the dreaded shopping for the gifts.  Luckily for my sister’s bridal tea party I was able to buy her some great Pampered Chef products that I sell and are simply sent straight to my doorstep… Now that’s the kind of shopping I like!  Well this is what came out of my love for wrapping gifts.

The flower wrapping was an idea by the one and only Martha Stewart.  The other wrap job was an old wine bottle decoration that my hubs got me on our wedding night “Wishes Do Come True”… I wish my sister the same dream.